Wednesday, September 5, 2012

The Barn

In the previous post, I forgot to mention that my good friend John came and felled a large pine tree for us. We didn't want to cut the pine, but the septic system was designed in such a way as to compromise the roots pretty badly. We took a chance and put the septic system in anyways, but after a month or two, the tree started to lean and it seemed as though it was not going to survive. John was kind enough to come up with his team and safely bring the tree down and I then cut up the branches and burned them. We have yet to disposition the trunk ... I hoped to do something creative with it, but we'll see if I can get to it before it starts to decompose.

From where the previous post ended, we have continued working on the pole barn and it is nearly finished. We put in the remaining four posts and attached the rather massive 2x12 headers.


Next we put up the rafters. Many thanks to Dad!


Installed roof decking


Then painted the metal roof panels to reduce wear and installed them. We also painted all the eaves and any untreated wood that might be left exposed.


For the floor, we decided on a poured concrete floor and hired someone recommended by a friend. They did a great job.


We installed the girts with the help of my friend Justin, then figured out how to install a door jamb


We installed the man-door and siding (as a tropical storm blew in!) with many more thanks to Dad and our neighbor Jeff.


We finished putting up the siding and my friend Nathaniel helped me build and install the barn doors.


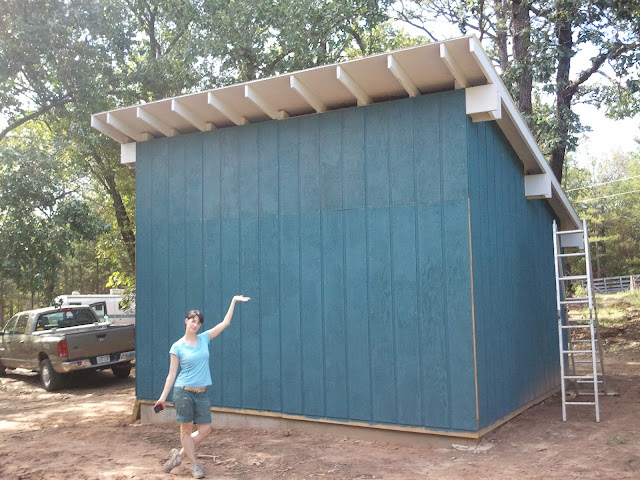
The tall side is quite tall!


Nearly finished. All that is left is trim work, finish caulking (our friend Melody already helped us start), and installing bug screen between the rafters on the eaves.


We hope to post another quick blog of the finished product. The rest of the year, we plan to be working full-time to save up for next year's projects and whatever else God has in store.

Saturday, July 28, 2012

Septic System, Driveway, Airstream, and Barn ... it's been too long!

Well, it's been February since we've updated ... sorry about the long delay. I guess we've just been busy working on the projects so much that we forgot to let people know what's happening.

From where we left off last time, the septic system is now finished! With LOTS of help from family and friends, the lateral lines were dug, filled with gravel, leveled (meticulously), and covered. Abundant thank you's to my Dad, Danny, Steve, Russ and Margaret, Brandon, Ronnie, and Justin for taking the time to help us. Also, our friend Ron blessed us in a big way by using his tractor to cover the lines back up ... we tried doing it by hand and it was going to take about two weeks, then he showed up and it took about two hours.

The septic tank is set and is being filled to prevent "floating"

Christie is showing us how real work is done!

We wheeled load upon load of gravel to the lateral lines with this and another wheel barrow.
Once the septic system was complete and fully functional, we celebrated for a moment ... then had our gravel driveway installed. This meant bulldozer work and a talented dump truck operator who skillfully "tailgated" gravel on our driveway. We decided to use river rock instead of concrete rock for aesthetic purposes; it was also a tad cheaper. Looking back, I might have gone with concrete rock for the sake of stability. River rock is round, which is pretty, but it can be slippery. Now that I've driven over it a hundred plus times it's packed very well, but still has a tendency to move under the weight of a vehicle.

Since we now have a good driveway, we brought our Airstream RV up to the property to work on restoring it. We took out the original 30 year old carpet due to some musty smells and some mild rot in the subfloor. We installed snap-together wood flooring that brightened the inside considerably. Christie painted the interior walls to brighten the low, arched ceiling and it looks drastically better. We are also in the process of reupholstering the original couch. I built a platform that spans the two twin beds so we can put our queen mattress on it and sleep comfortably. We aren't Airstream purists, but we do like the original design. It's much more welcoming now that we've updated some essentials. Christie has spear-headed this project and has done an amazing job!
Before

Before

After. The couch is yet to be reinstalled.

After

The outside of our 1983 Excella Airstream
Now that we have a place to move into, we need to have a place to store our stuff that we'd like to keep in the house once we build it. So, I've started work on our barn. It's a 16'x16' pole barn. I put up batter boards and squared up the area, then dug the post holes with the much-appreciated help of my friend Nathaniel. Now the posts are in the ground, squared, and the grade boards are installed and very level! I'm excited to see it when it's complete. It will be a bit of a project to finish it in the next few weeks.
Also, a big thanks to the website www.pole-barn.info for the free education on building a pole barn.
Batter boards and string squared and level

Post holes are dug and a 4" concrete footer is poured.
Thanks again to my friend Nathaniel for the help digging these holes by hand.

The first post is in, level, and braced. Concrete is poured up to ground level

I put treated 2x6 cleats around the bases of each post to give stability and security under the concrete

The corner posts are in!

Thanks for reading! Enjoy the summer heat and stay safe if you're working in it. I'm sure taking my time and drinking plenty of fluids. Feel free to come up and check out the progress if you're ever in the Russellville area.


Wednesday, February 8, 2012

Big Machines Doing Big Work

The past few months have seen big change at the Moore homestead. We've had two bulldozers, two backhoes (one with a jackhammer attached to it), and a dump truck visit the property. We've installed a water line and "frost free hydrant", a septic tank, cleared a large number of unwanted trees and stumps, dug lateral lines for the septic system, and had the bed of our driveway laid.

The first bulldozer pulled up the tree stumps that I left behind after thinning out the trees. Not only did he get the stumps, but he went ahead and pulled up the rest of the trees that I had planned to cut down. It is such a powerful machine that it uprooted the same amount of trees in two hours that I had cut down in two or three months! I couldn't help laughing to myself watching so much work being done in so little time.

The first backhoe was a rental that Dad and I used to dig a water service line and the lateral lines for our septic system. Now that the water line is installed, we have our first utility fully installed and functional on the property.

We also dug a hole for the septic tank with the backhoe, but we hit bedrock at about 2 feet, so we hired a jackhammer operator to come out with his "Hammer Hoe" to break the rock. I debated on renting an 80 lb jackhammer, but the Hammer Hoe was much more effective at 1350 lb! It was fun to watch him get through all that rock in a matter of hours, instead of days. Once he was done, the septic tank was installed and backfilled.

The dump truck delivered shale to build the roadbed for our driveway. He brought in three 12 yard loads of  shale and the second bulldozer came out to level and pack the shale. The dozer was also useful to pull the dump truck out of the mud on our property ... twice! Good thing this roadbed is being built, so hopefully no one will get stuck again.

We've still got to install the lateral lines, then cover them up, and put gravel over our shale roadbed. Little by little, it's starting to come together.

Monday, September 12, 2011

home made fun

Hi its christie here.
A while back i visited my brother in NY and sampled some of his homemade yogurt. 
Then he got my mom making it... but this week was my first attempt and i thought i would share it with you.  the recipe i copied down from his book "The Urban Homestead." Though you could find similar ones online.

I used a small heating pad instead of the cooler (which keeps it warm in this case.)  It worked well and was easy to do. And i made a 2quarts of yogurt instead of one.


You heat the yogurt first... to 180.
Don't over boil and stir often.  Then after reaching 180 take off the heat and let cool to 110. :)

 Before you pour into containers stir in the plain yogurt with the live cultures.  then add to glass quart jars. This part was pretty messy for me... but are you really cooking if you aren't making a mess?

pleas don't cry, its only yogurt.


 Then nestle your jars on a heating pad that has been turned to medium.  You might want to put it ontop of a cutting board to protect your counters. and wrap the heating pad in a towel.  Cover jars with a towel to create a warm bubble and wait.....


 8 Hours later.......... yogurt

Enjoy!

Thursday, September 8, 2011

Welcome to the Moore Homestead Online!

I've been talking with lots of you about the land that Christie and I are buying and so many people have been interested in what progress we've made. So, I started an online journal to document what we are doing. I know that I mostly like to see pictures when I'm reading people's blogs, so I'll try to be to-the-point and use lots of illustrations.


Since this is the first one, I'm going to put a bit of description of how we got started at the end, but first, here are some pictures:


 Day 1: spreading tick granules. This will fend off the ticks where we'll be spending lots of time working. It was a nice drizzly day, which is perfect for what we were doing since the granules need to be wet to activate.

 Christie is making sure I don't breathe in the dust from the tick granules. All while enjoying the beautiful forest scenery.

 Here is a shot of the untamed woods that we hope to transform into our homestead.

 More woods

It was such a beautiful day on top of the mountain. It felt a bit Irish, with the misty woods and this white horse roaming about the field adjacent to our property.

Day 2: a week or so later. We started cutting down the more manageable trees. This was a slightly embarrassing shot, but it shows some ax-slinging action! We mostly cut out dead trees and scraggly pines and cedars.

 Days 3-13: About 5 months later, I had a chance to come back and start clearing out more trees. I learned that it was much easier for me to cut down the cedars a few feet above the ground, mostly due to my height and my novice ax-wielding skills.


Here are some of the sandstone rocks we find all over the property. We are thinking that we will build a rock house using these and others from the area, since the whole mountain top is littered with sandstone.

 I raked the underbrush off of what will be a driveway. The stumps left behind are looking a bit scraggly, but they won't be there for too long.

Christie had the great idea to use a hand saw to trim the branches from the trunks on the big cedars that we cut. We used it for cutting out smaller trees, as well.

This is a little less embarrassing picture of me. It was in the upper 90's and 100's out there and I was soaked through and through. I drank gallons of water a day.

 Here are some trees waiting for me to lead them on to glory

This is the pile of cedar trunks that we plan to use for various projects. So far we've thought of raised garden beds, fence posts, and an open garage. If you have any other ideas, we'd love to hear them!

Lots of work yet to be done

A Parting Shot

Thanks for checking out the progress. I've written a bit about what and why we are doing at the end if you'd like to read more about it. And, if you are ever passing through the Russellville area, you are always welcome to stop by!


-----------------------------------------------------------------------------------------------------------------------------------


Christie and I want to create a homestead. A house, with a garden and peace to spare. We also love being part of a tight-knit community. We have had a close group of friends since before we were married, being in the band as well as our church family. Some dear friends of ours have decided to buy a big plot of land and use it to facilitate a community by way of a community garden, as well as potential for much more. These friends have extended an opportunity to us to own an acre of land and be even more involved in the community and the property. So, after months of deliberation, we've decided to go for it.


While we were recording last Fall, I read a book called "Living The Good Life" by Helen and Scott Nearing. The Nearings moved from NYC to a tiny farming community in Vermont during the Great Depression to create a homestead, learning to be self-sufficient and life off the land. This book really got me excited about the potential that we have to be free to live a simple, yet rich life. I think we were already pretty keen to the lifestyle in that Christie and I are both fond of simplicity and elemental things.


We decided that a homestead is an ideal way to go and we were going to try to make it happen. The first step was finding the property. That part was kind of handed to us, so we were ready to start toiling over the land and house designs and anything else that pertained to our goal. So, we walked around the property and get a feel for what we were getting into. 


I am now in the middle of clearing the land of poor trees and other unwanted vegetation. I am learning a lot along the way. Things like using an ax, felling trees, getting rid of briers and the joy of manual labor. I've done lots of manual labor in my life, but none has been so rewarding as the physical act of working toward a better future. That's a little cornball, but it is very much a different motivation than I have had in the past.


Thank you for reading!
Many Blessings,
Andy & Christie